Návody a skripty
Sada návodov a skriptov ktoré som vytvoril a môžu sa niekedy niekomu hodiť.
Konfigurácia internej SSL komunikácie za pomoci Self-Signed Certifikátov
Úvod
Na zabezpečenie komunikácie je potrebné vytvorenie vlastnej certifikačnej autority, jednotlivých certifikátov a kľúčov. Na vytvorenie vieme použiť spustiteľný súbor $SPLUNK_HOME/bin/splunk, ktorý nás prevedie samotným procesom, alebo sadu skriptov $SPLUNK_HOME/bin/genRootCA.sh a $SPLUNK_HOME/bin/genSignedServerCert.sh, ktoré daný príkaz volá. Proces je pomerne zdĺhavý a v prípade problémov je potrebné sledovať $SPLUNK_HOME/var/log/splunk/splunkd.log.
Legenda
Skrátené názvy často používaných súborov, adresárov a ciest.
./splunk == $SPLUNK_HOME/bin/splunk
splunkd.log == $SPLUNK_HOME/var/log/splunk/splunkd.log
server.conf == $SPLUNK_HOME/etc/system/local/server.conf
inputs.conf == $SPLUNK_HOME/etc/system/local/inputs.conf
outputs.conf == $SPLUNK_HOME/etc/system/local/outputs.conf
web.conf == $SPLUNK_HOME/etc/system/local/web.conf
auth/ == $SPLUNK_HOME/etc/auth
Vytvorenie systémovej premennej
Často používame premennú $SPLUNK_HOME ktorá obsahuje cestu k domovskému priečinku SPLUNK-u. Pre zjednodušenie práce môžeme vytvoriť systémovú premennú ktorá platí pre všetkých používateľov. V našom prípade, pre domovský priečinok /opt/splunkforwarder vyzerá príkaz na vytvorenie takto :
echo 'SPLUNK_HOME="/opt/splunkforwarder"' >> /etc/environment && source /etc/environment
Generovanie certifikátov a kľúčov certifikačnej autority1
Odporúčame vytvoriť samostatný adresár v adresári auth/ na uloženie novovytvorených súborov. V našom prípade sme vytvorili adresár CA_SSL :
mkdir $SPLUNK_HOME/etc/auth/CA_SSL
Začneme vytvorením privátneho kľúča našej certifikačnej autority :
$SPLUNK_HOME/bin/splunk cmd openssl genrsa -aes256 -out $SPLUNK_HOME/etc/auth/CA_SSL/privateKeyCA.key 2048
Po vykonaní príkazu nás konzola vyzve k zadaniu hesla autority. Zadáme unikátne heslo a bezpečne ho uschováme, nakoľko ho budeme používať pri podpise každého nového certifikátu našou autoritou.
Vytvoríme požiadavku na podpísanie certifikátu ktorú chceme podpísať pomocou nášho kľúča:
$SPLUNK_HOME/bin/splunk cmd openssl req -new -key $SPLUNK_HOME/etc/auth/CA_SSL/privateKeyCA.key -out $SPLUNK_HOME/etc/auth/CA_SSL/signingRequestCA.csr
Po vykonaní príkazu nás konzola vyzve k zadaniu hesla autority. Zadáme heslo ktoré sme použili pri tvorbe nášho kľúča. Kľúč sa následne dešifruje a použije na podpísanie danej požiadavky - teda si sami podpíšeme žiadosť o vydanie certifikátu.
Po overení hesla nás OpenSSL vyzve na zadanie parametrov certifikátu :
- Názov krajiny - najlepšie v dvojznakovom ISO formáte (EN,GB,DE,SK, atď.)
- Názov štátu alebo kraja - slovom alebo kódom
- Názov lokality - slovom názov mesta/dediny/obce
- Názov organizácie - slovom alebo slovným spojením názov firmy/organizácie
- Názov oddelenia - slovom alebo slovným spojením
- Plne kvalifikovaný názov zariadenia [FQDN] - Dôležité zadáme názov domény certifikačnej autority, ak chceme vytvoriť wildcard certifikát tak zadáme
*(napríklad*.mojadomena.sk)- Emailová adresa - emailová adresa na kontaktovanie administrátorov, bude zverejnená v certifikáte
Vytvorenú požiadavku podpíšeme pomocou kľúča ktorý sme predtým vytvorili :
$SPLUNK_HOME/bin/splunk cmd openssl x509 -req -in $SPLUNK_HOME/etc/auth/CA_SSL/signingRequestCA.csr -sha512 -signkey $SPLUNK_HOME/etc/auth/CA_SSL/privateKeyCA.key -CAcreateserial -out $SPLUNK_HOME/etc/auth/CA_SSL/signedCertificateCA.pem -days 1095
Budeme vyzvaní k zadaniu hesla od kľúča autority.
Vložené parametre vieme upraviť na základe dokumentácie OpenSSL, ktorú je možné nájsť na ich webe.
Platnosť certifikátu vieme upraviť pomocou prepínača-daysktorý udáva počet dní platnosti certifikátu. Po uplynutí platnosti je potrebné znovuvytvorenie nového certifikátu, alebo vypnutie kontroly platnosti certifikátov na systémoch ktoré ho používajú.
Generovanie certifikátov a kľúčov pre jednotlivé zariadenia1
Po vytvorení vlastnej certifikačnej autority môžeme pristúpiť k tvorbe certifikátov pre jednotlivé servery/zariadenia v našej architektúre. V tomto kroku vytvoríme certifikát pre našu hlavnú inštanciu SPLUNK-u, teda pre indexer s webovým rozhraním. Tento krok môžeme replikovať na každom zariadení, alebo vytvoríme na tejto inštancii všetky potrebné certifikáty a následne ich rozpošleme na jednotlivé zariadenia napríklad pomocou scp.
Jednotlivé kroky vieme upraviť tak, aby sme vytvorili wildcard certifikát ktorý vieme použiť pre všetky koncové zariadenia v našej infraštruktúre, avšak pri prelomení alebo expirácii certifikátu budú všetky zariadenia odpojené.
Odporúčame vytvoriť samostatný adresár v adresári auth/ na uloženie novovytvorených súborov. V našom prípade sme vytvorili adresár SPLUNK_SSL :
mkdir $SPLUNK_HOME/etc/auth/SPLUNK_SSL
Začneme vytvorením privátneho kľúča nášho servera :
$SPLUNK_HOME/bin/splunk cmd openssl genrsa -aes256 -out $SPLUNK_HOME/etc/auth/SPLUNK_SSL/privateKeyHost.key 2048
Budeme vyzvaní k vytvoreniu hesla od kľúča servera.
Vytvoríme požiadavku na podpísanie certifikátu ktorú chceme podpísať certifikačnou autoritou :
$SPLUNK_HOME/bin/splunk cmd openssl req -new -key $SPLUNK_HOME/etc/auth/SPLUNK_SSL/privateKeyHost.key -out $SPLUNK_HOME/etc/auth/SPLUNK_SSL/signingRequestHost.csr
Budeme vyzvaní k zadaniu hesla od kľúča servera.
Taktiež budeme vyzvaní k zadaniu informácií, ktoré sme zadávali aj pri tvorbe našej certifikačnej autority. Postupujeme podľa predošlých pokynov, avšak dbáme na to aby [FQDN] bolo jedinečné, prípadne spadalo do subdomény certifikátu (napríkladsplunk.mojadomena.sk) alebo bolo wildcardom.
Na záver použijeme vytvorenú požiadavku, certifikát certifikačnej autority a jej kľúč na vytvorenie výsledného certifikátu :
$SPLUNK_HOME/bin/splunk cmd openssl x509 -req -in $SPLUNK_HOME/etc/auth/SPLUNK_SSL/signingRequestHost.csr -SHA256 -CA $SPLUNK_HOME/etc/auth/CA_SSL/signedCertificateCA.pem -CAkey $SPLUNK_HOME/etc/auth/CA_SSL/privateKeyCA.key -CAcreateserial -out $SPLUNK_HOME/etc/auth/SPLUNK_SSL/signedCertificateHost.pem -days 1095
Budeme vyzvaní k zadaniu hesla od kľúča certifikačnej autority.
Zlúčenie vzniknutých súborov do formátu vhodného pre SPLUNK2
SPLUNK vyžaduje aby boli súbory ktoré potrebuje spojené do jedného v presne určenom poradí. Konkrétne sa jedná o nasledujúce poradie :
- Podpísaný certifikát zariadenia
- Kľúč od certifikátu zariadenia
- Podpísaný certifikát certifikačnej autority
Konkrétne by mal mať výsledný súbor nasledujúci formát :
-----BEGIN CERTIFICATE-----
xxxxxxxxxxxxxxxxxxxxxxxxx
-----END CERTIFICATE-----
-----BEGIN RSA PRIVATE KEY-----
Proc-Type: xxxxx
DEK-Info: xxxxx
xxxxxxxxxxxxxxxxxxxxxxxxx
-----END RSA PRIVATE KEY-----
-----BEGIN CERTIFICATE-----
xxxxxxxxxxxxxxxxxxxxxxxxx
-----END CERTIFICATE-----
Spomínaný súbor môžeme jednoducho vytvoriť s pomocou príkazu cat. V tomto prípade by sme mali $SPLUNK_HOME nahradiť cestou, nakoľko náš účet nemusí mať danú premennú nastavenú a príkaz nespúšťame cez ./splunk (v našom prípade /opt/splunk) :
cat /opt/splunk/etc/auth/SPLUNK_SSL/signedCertificateHost.pem /opt/splunk/etc/auth/SPLUNK_SSL/privateKeyHost.key /opt/splunk/etc/auth/CA_SSL/signedCertificateCA.pem > /opt/splunk/etc/auth/SPLUNK_SSL/mergedCertificate.pem
Konfigurácia indexera - prijímateľa logov3 4 5
Na nastavenie certifikátov a SSL je potrebné upraviť súbor server.conf a inputs.conf. Nami vytvorené certifikáty môžeme použiť aj pre webové rozhranie, úpravou súboru web.conf, a tým celú konfiguráciu zjednotiť.
Súbor server.conf v základnej inštalácii existuje, je potrebné ho však editovať. Pôvodný obsah ktorý nieje uvedený nemodifikujeme, upravíme alebo pridáme iba nižšie uvedené záznamy do každej stanzy :
[general]
serverName = splunk.mojserver.sk # Sem vložíme FQDN zariadenia z certifikátu

[sslConfig]
sslPassword = PLAINTEXT_KEY_PASS # Sem vložíme heslo od SSL kľúča v čitateľnom formáte, SPLUNK ho po reštarte zašifruje
enableSplunkdSSL = true # Hodnota TRUE nám povolí SSL, FALSE zakáže
serverCert = $SPLUNK_HOME/etc/auth/SPLUNK_SSL/mergedCertificate.pem # Sem vložíme cestu k zlúčenému certifikátu
cliVerifyServerName = false # Kontroluje či názov servera sedí s certifikátom, nefunguje pri self-signed certifikátoch takže musí byť FALSE
requireClientCert = false # Vyžaduje certifikát od klienta, ale spôsobuje problémy pri splunk CLI takže odporúča sa nechať FALSE
Stanza je konkrétny blok konfigurácie ktorý sa nachádza pod kategóriami. Teda všetko pod
[general]je z rovnakej kategórie až po nasledujúcu stanzu.
Súbor inputs.conf sa v čerstvej inštalácii SPLUNK-u nenachádza a je potrebné ho vytvoriť. Obsah by mal byť nasledujúci :
[SSL]
serverCert = $SPLUNK_HOME/etc/auth/SPLUNK_SSL/mergedCertificate.pem # Sem vložíme cestu k zlúčenému certifikátu
sslPassword = PLAINTEXT_KEY_PASS # Sem vložíme heslo od SSL kľúča v čitateľnom formáte, SPLUNK ho po reštarte zašifruje
sslVersions = tls1.2 # Zoznam verzií SSL ktoré chceme používať
useSSLCompression = true # Použitie kompresie pri prenose dát

[tcp-ssl:9997]
disabled = false # Zapnutie počúvania na danom porte
Stanza
[tcp-ssl:9997]definuje alternatívny názov pre port. Port môžeme ľubovoľne premenovať a aj zmeniť, formát však musí zostať rovnaký.
Pre použitie týchto certifikátov aj pre webové rozhranie stačí editovať súbor web.conf :
[settings]
enableSplunkWebSSL = true # Povolenie SSL na webovom rozhraní
privKeyPath = $SPLUNK_HOME/etc/auth/SPLUNK_SSL/privateKeyHost.key # Cesta k privátnemu kľúču
serverCert = $SPLUNK_HOME/etc/auth/SPLUNK_SSL/signedCertificateHost.pem # Cesta k certifikátu servera
sslPassword = PLAINTEXT_KEY_PASS # Sem vložíme heslo od SSL kľúča v čitateľnom formáte, SPLUNK ho po reštarte zašifruje
sslRootCAPath = $SPLUNK_HOME/etc/auth/CA_SSL/signedCertificateCA.pem # Cesta k certifikátu autority
httpport = 443 # Port na ktorom je poskytované webové rozhranie | Predvolená hodnota : 8000
Konfigurácia forwardera - odosielateľa logov3 4
Pre forwarder je taktiež potrebné editovať súbor server.conf :
[general]
serverName = forwarder.mojserver.sk # Sem vložíme FQDN zariadenia z certifikátu

[sslConfig]
sslPassword = PLAINTEXT_KEY_PASS # Sem vložíme heslo od SSL kľúča v čitateľnom formáte, SPLUNK ho po reštarte zašifruje
serverCert = $SPLUNK_HOME/etc/auth/FORWARDER_SSL/mergedCertificate.pem # Sem vložíme cestu k zlúčenému certifikátu
cliVerifyServerName = false # Verifikovanie názvu servera voči certifikátu, nefunguje pri self-signed certifikátoch takže musí byť FALSE
requireClientCert = false # Vyžaduje certifikát od klienta, ale spôsobuje problémy pri splunk CLI takže odporúča sa nechať FALSE
Následne vytvoríme súbor outputs.conf :
[tcpout]
defaultGroup = ssl-logging # Názov predvolenej skupiny

[tcpout:ssl-logging]
server = splunk.mojserver.sk:9997 # Server a port kam chceme posielať logy

[tcpout-server://splunk.okmavkacka.sk:9997]
useSSL = true # Povolenie SSL
clientCert = $SPLUNK_HOME/etc/auth/FORWARDER_SSL/mergedCertificate.pem # Cesta k zlúčenému certifikátu
sslPassword = PLAINTEXT_KEY_PASS # Sem vložíme heslo od SSL kľúča v čitateľnom formáte, SPLUNK ho po reštarte zašifruje
useACK = true # Ak je TRUE tak forwarder overuje či súbory ktoré odoslal prišli na daný server, ak nie posiela ich znova a čaká na ACK paket od servera
disabled = false # Zapnutie výstupu na porte
useClientSSLCompression = true # Povolenie kompresie v SSL komunikácii
sslVersions = tls1.2 # Zoznam povolených verzií SSL
SQUID proxy v Dockeri
![]()
Spustenie/Inštalácia
Proxy vieme spustiť v docker-i pomocou príkazu:
docker compose up
Pokiaľ spúšťame proxy na čerstvej inštalácii Linux-u vieme nainštalovať docker a všetky prerequizitá pomocou týchto príkazov:
sudo apt update
sudo apt upgrade -y
sudo apt install -y curl gnupg ca-certificates lsb-release apache2-utils
sudo mkdir -p /etc/apt/keyrings
curl -fsSL https://download.docker.com/linux/ubuntu/gpg | sudo gpg --dearmor -o /etc/apt/keyrings/docker.gpg
echo \
  "deb [arch=$(dpkg --print-architecture) signed-by=/etc/apt/keyrings/docker.gpg] https://download.docker.com/linux/ubuntu \
  $(lsb_release -cs) stable" | sudo tee /etc/apt/sources.list.d/docker.list > /dev/null
sudo apt update
sudo apt install -y docker-ce docker-ce-cli containerd.io docker-compose-plugin
Konfigurácia nastavení
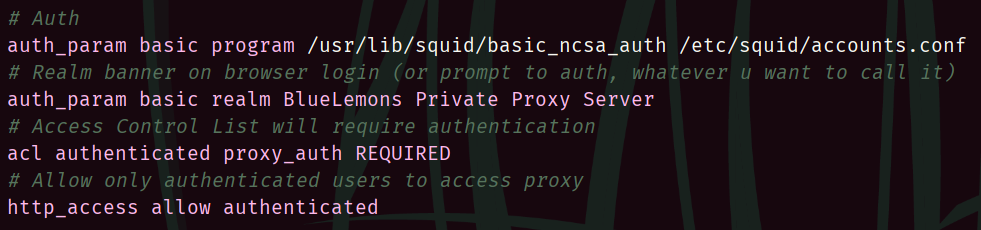
Všetky nastavenia týkajúce sa proxy servera nájdeme v súbore app/proxy/squid.conf. V danom súbore nás prioritne zaujíma nastavenie auth_param,http_access a http_port(v spodnej časti súboru) :
V prípade zmeny portu je potrebné daný port upraviť aj v docker-compose.yml.
Pridanie používateľa
Všetky prihlasovacie údaje všetkých povolených používateľov sú uložené v súbore app/proxy/accounts.conf vo formáte prihlasovacie_meno:heslo_v_hashi. V prípade potreby pridania nového prístupu postupujeme jednoducho - do daného súboru pridáme ďalší riadok.
Pre vytvorenie zahashovaného hesla a používateľského mena vieme použiť jednoduchý príkaz v balíčku apache2-utils ktorý sme nainštalovali pomocou skriptu vyššie:
htpasswd app/proxy/accounts.conf username
Príklad použitia :

Po úspešnom vložení hesla a jeho zopakovaní vieme korektnosť overiť nahliadnutím do súboru app/proxy/accounts.conf, kde sa na konci objaví riadok vo vyššie spomínanom formáte :

Následne len znova spustíme docker compose up aby sa dané nastavenia aktualizovali aj pre kontajner.
Tutorials and scripts
Some tutorials and scripts, which might come in handy for someone sometime.
Configuring internal SSL communication using Self-Signed Certificates
Introduction
To ensure encrypted communication, it is necessary to create your own certification authority, individual certificates and keys. We can use the $SPLUNK_HOME/bin/splunk executable to create it, which walks us through the process itself, or the $SPLUNK_HOME/bin/genRootCA.sh and $SPLUNK_HOME/bin/genSignedServerCert.sh set of scripts, which are called by the command. The process is quite lengthy and you need to watch $SPLUNK_HOME/var/log/splunk/splunkd.log in case of problems.
Legend
Abbreviated names of frequently used files, directories and paths :
./splunk == $SPLUNK_HOME/bin/splunk
splunkd.log == $SPLUNK_HOME/var/log/splunk/splunkd.log
server.conf == $SPLUNK_HOME/etc/system/local/server.conf
inputs.conf == $SPLUNK_HOME/etc/system/local/inputs.conf
outputs.conf == $SPLUNK_HOME/etc/system/local/outputs.conf
web.conf == $SPLUNK_HOME/etc/system/local/web.conf
auth/ == $SPLUNK_HOME/etc/auth
Creating a system variable
We often use the $SPLUNK_HOME variable which contains the path to the SPLUNK home folder. To simplify the work, we can create a system variable that applies to all users. In our case, for the /opt/splunkforwarder home folder, the command to create it looks like this :
echo 'SPLUNK_HOME="/opt/splunkforwarder"' >> /etc/environment && source /etc/environment
Generating CA certificates and keys1
We recommend creating a separate directory in auth/ to store the newly created files. In our case, we have created the CA_SSL directory:
mkdir $SPLUNK_HOME/etc/auth/CA_SSL
We start by creating a private key for our CA :
$SPLUNK_HOME/bin/splunk cmd openssl genrsa -aes256 -out $SPLUNK_HOME/etc/auth/CA_SSL/privateKeyCA.key 2048
After the command is executed, the console prompts us for the authority password. We will enter a unique password and store it safely, as it will be used when our authority signs each new certificate.
We create a request to sign the certificate we want to sign with our key :
$SPLUNK_HOME/bin/splunk cmd openssl req -new -key $SPLUNK_HOME/etc/auth/CA_SSL/privateKeyCA.key -out $SPLUNK_HOME/etc/auth/CA_SSL/signingRequestCA.csr
After the command is executed, the console prompts us for the authority password. Enter the password we used to create our key. The key is then decrypted and used to sign the request - meaning that we signed the certificate request ourselves.
After password verification, OpenSSL prompts us for the certificate parameters:
- Country name - preferably in two-character ISO format (EN,GB,DE,SK, etc.)
- Name of the country or region - in word or code
- Name of the location - in words the name of the town/village/village
- Name of organisation - in word or in phrase name of company/organisation
- Name of department - in word or in phrase
- Fully Qualified Device Name [FQDN] - Important enter the domain name of the CA, if you want to create a wildcard certificate enter
*(for example*.mydomain.com)- Email address - email address for contacting administrators, it will be published in the certificate
Sign the created request using the key we created earlier :
$SPLUNK_HOME/bin/splunk cmd openssl x509 -req -in $SPLUNK_HOME/etc/auth/CA_SSL/signingRequestCA.csr -sha512 -signkey $SPLUNK_HOME/etc/auth/CA_SSL/privateKeyCA.key -CAcreateserial -out $SPLUNK_HOME/etc/auth/CA_SSL/signedCertificateCA.pem -days 1095
You will be prompted to enter the authority key password.
We can modify the entered parameters based on the OpenSSL documentation, which can be found on their website.
We can modify the validity of the certificate using the-daysswitch which specifies the number of days the certificate is valid. After expiration, it is necessary to recreate a new certificate, or disable certificate validity checking on systems that use it.
Generate certificates and keys for individual devices1
After creating our own CA, we can proceed to create certificates for individual servers/devices in our architecture. In this step, we will create a certificate for our main instance of SPLUNK, i.e. the indexer with the web interface. We can replicate this step on each device, or we can create all the necessary certificates on this instance and then send them to the individual devices using scp for example.
We can modify the individual steps to create a wildcard certificate that we can use for all endpoint devices in our infrastructure, but if the certificate is broken or expires, all devices will be disconnected.
We recommend creating a separate directory in auth/ to store the newly created files. In our case, we have created the SPLUNK_SSL directory :
mkdir $SPLUNK_HOME/etc/auth/SPLUNK_SSL
We start by creating a private key for our server :
$SPLUNK_HOME/bin/splunk cmd openssl genrsa -aes256 -out $SPLUNK_HOME/etc/auth/SPLUNK_SSL/privateKeyHost.key 2048
We will be prompted to create a password for the server key.
We will create a certificate signing request that we want to be signed by a certificate authority :
$SPLUNK_HOME/bin/splunk cmd openssl req -new -key $SPLUNK_HOME/etc/auth/SPLUNK_SSL/privateKeyHost.key -out $SPLUNK_HOME/etc/auth/SPLUNK_SSL/signingRequestHost.csr
You will be prompted to enter the password for the server key.
We will also be prompted to enter the information we entered when we created our CA. We follow the previous instructions, but make sure that the [FQDN] is unique, or that it belongs to a subdomain of the certificate (such assplunk.mydomain.com), or that it is a wildcard.
Finally, we use the created request, the CA certificate and its key to create the resulting certificate :
$SPLUNK_HOME/bin/splunk cmd openssl x509 -req -in $SPLUNK_HOME/etc/auth/SPLUNK_SSL/signingRequestHost.csr -SHA256 -CA $SPLUNK_HOME/etc/auth/CA_SSL/signedCertificateCA.pem -CAkey $SPLUNK_HOME/etc/auth/CA_SSL/privateKeyCA.key -CAcreateserial -out $SPLUNK_HOME/etc/auth/SPLUNK_SSL/signedCertificateHost.pem -days 1095
We will be prompted to enter the password for the CA key.
Merging the resulting files into a format suitable for SPLUNK2
SPLUNK requires the files it needs, to be concatenated into one in a specific order. Specifically, the following order :
- Signed certificate of the device
- Certificate key of the device
- Signed certificate of the certification authority
Specifically, the resulting file should have the following format :
-----BEGIN CERTIFICATE-----
xxxxxxxxxxxxxxxxxxxxxxxxx
-----END CERTIFICATE-----
-----BEGIN RSA PRIVATE KEY-----
Proc-Type: xxxxx
DEK-Info: xxxxx
xxxxxxxxxxxxxxxxxxxxxxxxx
-----END RSA PRIVATE KEY-----
-----BEGIN CERTIFICATE-----
xxxxxxxxxxxxxxxxxxxxxxxxx
-----END CERTIFICATE-----
We can easily create this file with the cat command. In this case we should replace $SPLUNK_HOME with the path, since our account may not have the variable set and we are not running the command via ./splunk (in our case /opt/splunk) :
cat /opt/splunk/etc/auth/SPLUNK_SSL/signedCertificateHost.pem /opt/splunk/etc/auth/SPLUNK_SSL/privateKeyHost.key /opt/splunk/etc/auth/CA_SSL/signedCertificateCA.pem > /opt/splunk/etc/auth/SPLUNK_SSL/mergedCertificate.pem
Configuring the indexer - log receiver3 4 5
To set up certificates and SSL, you need to edit the server.conf and inputs.conf files. We can also use the certificates we created for the web interface by editing the web.conf file, thus unifying the whole configuration.
The server.conf file exists in the base installation, but needs to be edited. Do not modify the original content that is not listed, edit or add only the entries listed below to each stanza :
[general]
serverName = splunk.myserver.com # Insert the FQDN of the device from the certificate here

[sslConfig]
sslPassword = PLAINTEXT_KEY_PASS # Here we insert the password from the SSL key in a readable format, SPLUNK will encrypt it after reboot
enableSplunkdSSL = true # TRUE will enable SSL, FALSE will disable
serverCert = $SPLUNK_HOME/etc/auth/SPLUNK_SSL/mergedCertificate.pem # Here we insert the path to the merged certificate
cliVerifyServerName = false # Checks if the server name matches the certificate, does not work for self-signed certificates so must be set to FALSE
requireClientCert = false # Requires a certificate from the client, but causes problems with SPLUNK CLI so it is recommended to leave it to FALSE
Stanza is a specific configuration block that is located under categories. So everything under
[general]is from the same category up to the next stanza.
The inputs.conf file is not present in a fresh installation of SPLUNK and needs to be created. The contents should be as follows :
[SSL]
serverCert = $SPLUNK_HOME/etc/auth/SPLUNK_SSL/mergedCertificate.pem # Insert the path to the merged certificate here
sslPassword = PLAINTEXT_KEY_PASS # Here we insert the password from the SSL key in a readable format, SPLUNK will encrypt it after reboot
sslVersions = tls1.2 # List of SSL versions we want to use
useSSLCompression = true # Use compression when transferring data

[tcp-ssl:9997]
disabled = false # Enable listening on a given port
The
[tcp-ssl:9997]stanza defines an alternate name for the port. The port can be renamed and even changed at will, but the format must remain the same.
To use these certificates also for the web interface, just edit the web.conf file :
[settings]
enableSplunkWebSSL = true # Enable SSL on the web interface
privKeyPath = $SPLUNK_HOME/etc/auth/SPLUNK_SSL/privateKeyHost.key # Path to the private key
serverCert = $SPLUNK_HOME/etc/auth/SPLUNK_SSL/signedCertificateHost.pem # Path to the server certificate
sslPassword = PLAINTEXT_KEY_PASS # Insert the password from the SSL key here in a readable format, SPLUNK will encrypt it after reboot
sslRootCAPath = $SPLUNK_HOME/etc/auth/CA_SSL/signedCertificateCA.pem # Path to the authority certificate
httpport = 443 # Port on which the web interface is provided | Default value : 8000
Configuring the forwarder - log sender3 4
For the forwarder it is also necessary to edit the server.conf file :
[general]
serverName = forwarder.myserver.com # Insert the FQDN of the device from the certificate here

[sslConfig]
sslPassword = PLAINTEXT_KEY_PASS # Here we insert the password from the SSL key in a readable format, SPLUNK will encrypt it after reboot
serverCert = $SPLUNK_HOME/etc/auth/FORWARDER_SSL/mergedCertificate.pem # Insert the path to the merged certificate here
cliVerifyServerName = false # Verify the server name against the certificate, doesn't work for self-signed certificates so must be set to FALSE
requireClientCert = false # Requires a certificate from the client, but causes problems with SPLUNK CLI so it is recommended to leave it to FALSE
Then create the outputs.conf file :
[tcpout]
defaultGroup = ssl-logging # Default group name

[tcpout:ssl-logging]
server = splunk.mojserver.en:9997 # Server and port where we want to send logs

[tcpout-server://splunk.okmavkacka.sk:9997]
useSSL = true # Enable SSL
clientCert = $SPLUNK_HOME/etc/auth/FORWARDER_SSL/mergedCertificate.pem # Path to the merged certificate
sslPassword = PLAINTEXT_KEY_PASS # Insert the password from the SSL key here in a readable format, SPLUNK will encrypt it after reboot
useACK = true # If TRUE, the forwarder verifies that the files it sent arrived at the server, if not it sends them again and waits for an ACK packet from the server
disabled = false # Enable output on the port
useClientSSLCompression = true # Enable compression in SSL communication
sslVersions = tls1.2 # List of enabled SSL versions
SQUID proxy in Docker
![]()
Setup/Installation
Proxy can be launched in docker using following command :
docker compose up
In case we are using freshly installed Ubuntu, we can use following commands to update system and install all prerequisites :
sudo apt update
sudo apt upgrade -y
sudo apt install -y curl gnupg ca-certificates lsb-release apache2-utils
sudo mkdir -p /etc/apt/keyrings
curl -fsSL https://download.docker.com/linux/ubuntu/gpg | sudo gpg --dearmor -o /etc/apt/keyrings/docker.gpg
echo \
  "deb [arch=$(dpkg --print-architecture) signed-by=/etc/apt/keyrings/docker.gpg] https://download.docker.com/linux/ubuntu \
  $(lsb_release -cs) stable" | sudo tee /etc/apt/sources.list.d/docker.list > /dev/null
sudo apt update
sudo apt install -y docker-ce docker-ce-cli containerd.io docker-compose-plugin
Configuration
All setting related to proxy server can be found in app/proxy/squid.conf file. Main settings which concern us in specified file are auth_param,http_access and http_port(at the bottom of the file) :
In case we change designated port, we need to edit it in docker-compose.yml file as well.
Adding new user
All credentials of allowed users are stored in app/proxy/accounts.conf file, which has username:password_in_hash format. Adding new account is pretty straightforward - we append another record at the end of this file.
In order to create hashed password, we need to use package apache2-utils, which was installed using script provided above :
htpasswd app/proxy/accounts.conf username
Example usage :
After typing desired password, we can verify our success by simply looking inside app/proxy/accounts.conf file, which will now contain one more line :
We follow up by running docker compose up, so that all setting are applied for our container as well.